fbpx
0
Browsing Category

DIY on a Dime

1

DIY Craft – Roped Hurricane Vase

I have another easy frugal fabulous home décor project for you today! When I say easy I really am not kidding around! The supplies and time you need are very minimal and the total cost of east of these ended up around $2.

Roped Hurricane Vase - penniesintopearls.com - Easy DIY craft idea from copycat Homegoods decor. Super easy to follow tutorial on DIY craft project.

Copycat Inspiration
The original expensive piece that I used for inspiration on this project was spotted at one of my all time favorite stores Homegoods. As I walked into the store they had a beautiful table decorated with all sorts of nautical or roped items.

Roped Hurricane Vase - penniesintopearls.com - Easy DIY craft idea from copycat Homegoods decor. Super easy to follow tutorial on DIY craft project.

I walked up to these beautiful vases to see how much they cost, retail was about $25 each! I knew right then they weren’t meant for me to purchase that day but to go home and find something similar I could make for way less money! A DIY craft idea was born!

Items You Need
Any size glass jar or vase you like
Hot glue and gun
Rope (I bought this 50ft spool of rope at Home Depot for under $5)

Roped Hurricane Vase - penniesintopearls.com - Easy DIY craft idea from copycat Homegoods decor. Super easy to follow tutorial on DIY craft project.

DIY Craft How To

1. Make sure to get all of the gunk and dust off of your jars. I found these at one of our local thrift stores but they had this broken-apart stick design all over them. Luckily they just slipped off and soap and water was all I needed.

Roped Hurricane Vase - penniesintopearls.com - Easy DIY craft idea from copycat Homegoods decor. Super easy to follow tutorial on DIY craft project.
2. Decide where you want to place your rope. I was going to try and do an exact copycat design duplicate with these and the ones I saw at the store. But after I finished the first, I decided against that idea.
3. Start attaching the rope by placing a ribbon of hot glue along the base of the vase. Be sure to attach the rope before the glue dries. For the first layer or two of rope you will want to continually attach each part of the rope with glue.

As you are working try to keep the rope tight and each layer close together. You can do this by gently pressing down on the layers each time you add glue.

Once your first two layers are attached you can start using less glue. I used a small amount (about 1” long) on opposite sides of the glass about every two to three layers. But with your last two layers you will want to go back to using more glue.
4. Finish off the rope when you think it looks fabulous by doing a diagonal cut along the rope and attaching with hot glue. Try to tuck the end of the rope gently behind the lower layer.

Roped Hurricane Vase - penniesintopearls.com - Easy DIY craft idea from copycat Homegoods decor. Super easy to follow tutorial on DIY craft project.

That’s it! So quick and super frugal fabulous! Right now I am keeping these beauties on one of my entry tables in our home but my plan is to get some large candles to put inside each vase and move them out to live on our porch. Maybe when the holidays come along I will switch the candles out for some Christmas lights. So many options…

What do you think?
Where is your favorite place for DIY craft inspiration? Do you have some vases already at home that you want to do this project to? Let me know in the comments below. Let’s chat!

Ikea Ideas – Repurposed Spice Rack

Have you ever been to Ikea before? I had never stepped foot in one of their stores until I was in college. It didn’t take more than 60 seconds to realize this would soon be one of my new favorite stores!

Don’t have one nearby? The good news is you can buy pretty much anything in their stores online.

They have super cute home décor items for really great prices. Some of my favorite things there are items that are very basic and need a little DIY to make them completely unique. Just like these spice racks.

They are only $4 each to buy, they come in unfinished wood, and they only take about 3 minutes to put together. Doesn’t this piece just scream out DIY? This is definitely one of those Ikea ideas that takes little time and money to make it into something frugal fabulous!

Now don’t think strictly along the lines of a spice rack. That might be what the store intended the use to be but really it’s just a cute shelf. That is what I will be using mine for.

Repurposed IKEA Spice Rack - penniesintopearls.com - Great idea on how to repurpose IKEA $4 spice rack. Perfect for the kitchen or any other room. Continue Reading →

Darling DIY Pencil Case Tutorial

Get ready for a super cute and super easy sewing project brought to you from Charlene over at Thinking Outside the Pot. Not only is this tutorial super easy to follow along and you end up with a really cute DIY pencil case at the end but she has even more great ideas on her blog! So make sure to check it out once you get all these tips. 

Thanks again Charlene for sharing your super cute craft with us! 

DIY Back-to-School Pencil Bag - penniesintopearls.com - Follow these easy steps to make your own DIY pencil bag. Get the kids back to school in style and on budget!

Brittany contacted me at the beginning of the summer to see if I wanted to do this post. I was so excited to do a back-to-school post for her. I love Pennies into Pearls. It is such a fun site, and I love how much you can learn from Brittany.

Her motto of making pennies into pearls is just so clever. Sometimes it is just easier to go buy something rather than make it. Is it really saving you any money though? I think not! I love that so many things can be made yourself easier and cheaper rather than buying them.

If you visit my blog Thinking Outside the Pot you will see how much I love Diy projects. I have several different diy projects that I hope you all will love.

I am so in love with this new diy back-to-school pencil case I made! It’s so easy and I made it in about an hour. I am sure the next one I make I will be able to make it quicker though. They are just that easy. This would be a great project for your kids to do during those last weeks before school starts. Crazy that summer has flown by so fast, and school is about to start. Lets start out a great year with a pretty rad pencil bag. Enjoy!

How to Make Your Own DIY Pencil Case

Things you need:

1 fat quarter fabric for the lining

1 fat quarter fabric for the outside piece

1- 9 inch zipper

scissors

sewing machine

measuring tape

thread

1st step: Cut both fabrics to be 9.5 x 5.5. You will need two of each fabric.

DIY Back-to-School Pencil Bag - penniesintopearls.com - Follow these easy 4 steps to make your own DIY pencil bag. Get the kids back to school in style and on budget!

2nd step: Place one of your outer pieces right-side up, and place the zipper face down along the long edge. Place the lining piece on top of the zipper, right-side down. Pin in place. With a zipper foot, sew all three layers together along the top edge.

DIY Back-to-School Pencil Bag - penniesintopearls.com - Follow these easy 4 steps to make your own DIY pencil bag. Get the kids back to school in style and on budget!

3rd step: Fold the sewn pieces out of the way, and sandwich the other half of the zipper between the other two pieces of fabric. Outer fabric right-side up, zipper right-side down, lining fabric right-side down. Pin in place, then sew this edge.

DIY Back-to-School Pencil Bag - penniesintopearls.com - Follow these easy 4 steps to make your own DIY pencil bag. Get the kids back to school in style and on budget!

4th step: Pull the fabric layers away from the zipper, and press with an iron.

5th step: Pin the lining fabrics together and the outer fabrics together, folding the seam allowance and zipper toward the lining. Make sure to leave your zipper halfway open. Also I always put two pins right where I am leaving an opening. This way you don’t forget to leave it open.

4th step bag

6th step: Sew around the edges of the lining and outer fabrics, leaving an opening of about 2 inches on the bottom of the lining.

7th step: Snip the corners and excess zipper tape, and turn the bag right-side-out by pulling the outer fabric through the gap in the lining. After you do this, you may need to fiddle with it to get the corners all straight. I pulled the lining out a little and used my sewing machine and sewed the opening up with a zig zag stitch.

pencil bag

Tip: if it bugs you that the lining is not attached to the outer fabric you can sew fusible lining between the fabrics then iron it. This will keep it in place. I just thought it worked great with out. 

Don’t forget to check out my blog Thinking Outside The Pot!

What do you think?
So don’t you just love this super easy and cheap idea from Charlene!? Have you ever made something like this before? Are you motivated to try it out? Let me know in the comments below. I would love to hear about your back to school projects! 

Coffee Table Makeover

Have you guys heard about an amazing blog called Refashionably Late? It is absolutely frugal fabulous! Ruth does such a perfect job of making over furniture and  she has so many wonderful DIY furniture refinish and repurposing projects all over her blog. After you read this guest post from her you really need to go check her out! Thank you so much Ruthie for popping in and sharing this beyond cute project!

Coffee Table Makeover

Here she is: 

coffee table makeover

First off, thank you to Brittany for having me guest post on Pennies Into Pearls today! I’m super excited to get to know her followers and share my love for furniture restoration and DIY projects! If you like what you see please come check out my blog, Refashionably Late!

So a little bit about me, I am a huge Craigslist addict! I love to find deals on items and what I love even more is finding FREE items on Craigslist! Craigslist can be hit or miss but if you wait patiently you’ll find some really great stuff! Something I discovered a couple months ago was Craigslist email alerts. You can sign up an account and have Craigslist email you when a specific item you are looking for becomes available. For more details regarding Craigslist alerts go to one of my favorite blogs, Gwen at The Makerista.

coffee table makeover

The Details
Anyways….I scored this little gem on Craigslist for free!! How awesome is that!? Now it’s not terrible to start with, but it does need a little TLC. The vinyl was peeling a little and there were some scuffs and dings. I started with sanding the table with my electric sander and smoothing the edges with regular sand paper.

Once it was finished I dusted it all off and taped off the strip of lighter wood on the top of the table. I used Frog Tape because I find that to be the best when trying to make straight lines with no bleeding paint. I wanted to stain that section a darker color once I finished painting the rest of the table.
coffee table makeover

I’m a huge fan of spray paint, especially for primer, and it’s even better when the paint is primer and paint in one! I gave the table 3 coats of one of my favorite colors, Valspar Indigo Streamer. I gave the table an hour or so to dry in between coats. The can says you can recoat at any time though. I like to see how it dries before applying another coat because wet paint can be deceiving.
coffee table makeover

I let the blue paint dry over night to make sure when I removed the line that I had a nice straight line with no runs. Unfortunately, some dust got under one section of the paint so it painted over the lighter wood stripe. I was actually okay with it because I was starting to think I’d like it to be painted white. I put the frog tape on either side of the stripe and began painting it white. I did 3 coats of white with a light sand in between the 2nd and 3rd coat to ensure it had a nice, smooth finish. 
coffee table makeover

I removed the tape and it looks amazing! I’m super happy with how it turned out! Also….always do a couple coats of polyurethane on top of your projects. Especially furniture that will endure lots of traffic! I think coffee tables might fall under that category! 😉
coffee table makeover

Coffee Table Makeover

It was totally meant to be that the dust got under the tape which allowed the blue spray paint to leak! I am loving the white stripe! I can see this piece in a bachelors pad but I’m kind of loving it in my living room! I’m a little obsessed with the color blue lately and love accenting my home with all different shades of blue.

This isn’t my first table makeover, check out two of my previous makeovers on the blog! I gave my kitchen table a face lift with some paint and stenciling on top! I also turned an old coffee table into a beautiful large ottoman! I would love for you to stop by and say hello and while your at it check out my other projects in my project gallery! 🙂

Thanks Brittany for having me today! I’m a big fan of your work and so thankful to have contributed to your blog! Have a great day everyone!

1

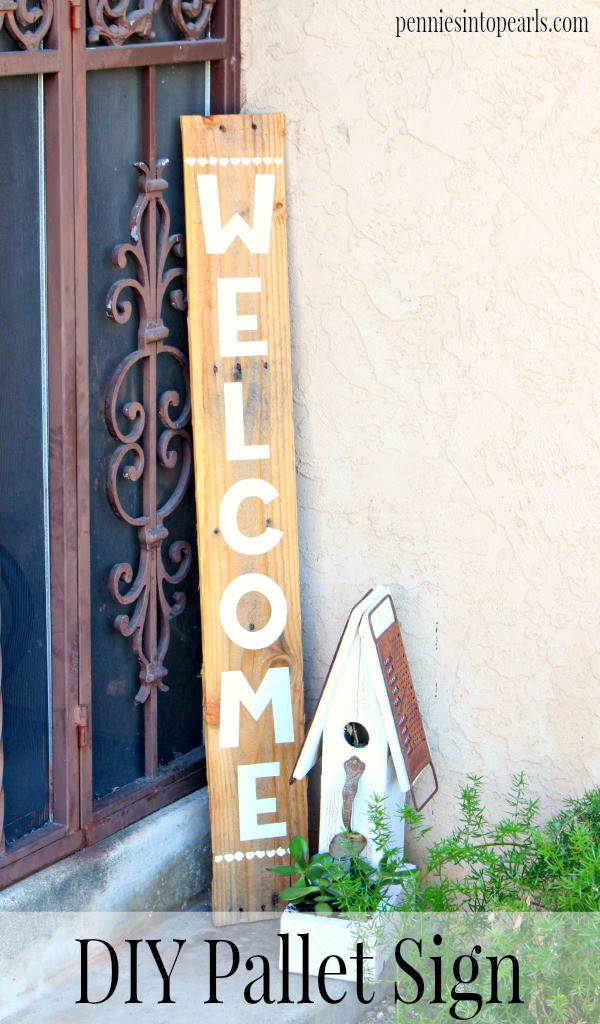
Easy Peasy Pallet Wood Sign

Oh how I love pallet wood! Have I said that before? Just in case you didn’t already know, I am a huge fan! Take a look back at my pallet planter boxes and you will understand why I have a giant pile of scrap pallet wood. Just imagine about 20 pallets in my garage… Hence my love for pallet crafts!

Not are pallet crafts awesome because they are made out of 100% free reclaimed wood but this particular pallet wood sign it is super simple! I think I put the whole thing together in about 20 minutes and it only took that long because it took me a few minutes to get Cricut Craft room to work correctly.

So I did use a Cricut to cut out vinyl letters for my sign but if you trace out your sign first then paint it in with some “outside approved” paint then I am sure it would look wonderful! I actually might choose that option for my next sign. The hand painted look mike give it a more rustic feel.

DIY Pallet Wood Sign - penniesintopearls.com - If you have a love for pallet crafts then this is for you! Come see how quick I was able to make this pretty thing!  Continue Reading →

Mason Jar Crafts – Rope Handled Lantern

One of my favorite things to do when it comes time to relax is sit back and look through catalogs from fancy-pants stores that I can’t even afford to shop their clearance section. You know the kind of stores I’m talking about…

You might be wondering why I like to torture myself. The truth is that it isn’t torture at all. I get so excited when I see something that literally costs hundreds of dollars and I know I can make it for a fraction of the price! Yep. You can to!

Mason Jar Lanterns - penniesintopearls.com - Crazy easy mason jar crafts! Super easy way to create your own Pottery Barn copycat craft! Continue Reading →

4

How to Make Your Thrift Store Finds Match

Paint is your best friend when it comes to making your thrift store finds match. If you are in the market for something in particular like office organizers or kitchen décor, there will pretty much always be a good selection at a thrift store but chances are they aren’t going to match. A very easy solution is to paint! Let’s use the example of these boring old vases.

When you walk into our local Salvation Army thrift store the first thing you are sure to spot are vases, vases, and more vases! There is literally an entire row dedicated to glass vases and table settings. Sometimes, the selection even leeks over into a second row! My guess is that this is not unique to our particular local thrift store.

I have been to a “few” thrift stores in my day and it is pretty much a 100% guarantee that you will be able to find a nice selection of vases. You can also find them at the dollar store but at a thrift store you will have a lot more of a selection when it comes to the style.

Painted Glass Vases Pin - penniesintopearls.com - Tips on the easiest and cheapest way to get all of your thrift store finds to match. Come see how easy it can be! Continue Reading →

15

How to Make a Birdhouse From Scrap Wood

If you have been a frugal fabulous reader for a little while here you might be starting to understand my love for pallet wood. It’s free wood! It is a little bit of work to get that pallet taken apart (here is my video tutorial on how to take apart a pallet) but it is more than worth it. It’s not only free but the wood is so beautiful with so much character.

Okay, I’ll stop obsessing now.

My front porch is seriously lacking in the “welcome, come on in” vibe and with spring and summer in the air I thought making a cute little birdhouse out of some left over pallet wood was a perfect start for an update. Not only does this simple décor item look super cute this time of year but can be updated with some fall leaves or Christmas lights later on in the year.Pallet Wood Birdhouse - penniesintopearls.com - Complete plans on how to make your own birdhouse out of scrap wood you already have, no matter what size.

Are you for me to show you how to make a birdhouse of your very own? I hope so! This project is way easy to make and with this tutorial you will be able to make it with any size scrap wood you have laying around.

Continue Reading →

1

5 Tips for the Perfect DIY Furniture Project

There really isn’t a much more frugal and fabulous way to get new furniture then thru a good DIY furniture project! Find a piece of furniture with great lines and structurally strong and you are ready to get to work.

Thinking about doing a DIY furniture project? Here are 5 tips to help you get the perfect project started!

5 Tips for the Perfect DIY Project - penniesintopearls.com - Easy tips to help you pick and refinished or repurpose the most beautiful furniture DIY project

Have an End Project in Mind
Before you get started on creating your next DIY furniture piece, you need to figure out what you want to end up with or what type of furniture you want to transform. Do you want a new dresser? Are you in need of a new TV stand? You need to figure out what your desired end result is so you know what type of furniture to start out with. Continue Reading →